Long Division Made Easier

By: Katrina Maccalous, MS Ed

Long division is understandably one of the more challenging processes students are expected to master in 4th and 5th grade. Many times students have not yet mastered their multiplication facts, while others are still struggling to develop conceptual understandings of multiplicative reasoning. In a perfect world we could wait until these concepts are internalized before introducing standard algorithms, but state-standards and standards-based assessments require students to use the algorithms to solve multi-digit problems. We must also hold high expectations for every child, and that includes exposing them to grade-level content with the appropriate scaffolds in place based on students’ current level of understanding.

This is precisely what this post is about–scaffolding instruction to allow every student the opportunity to work through these processes. This particular post is on how to support students with the long division algorithm. I hope you find this useful!

Firstly, what is long division?

According to Oxford Languages, long division is “arithmetical division in which the divisor has two or more figures, and a series of steps is made as successive groups of digits of the dividend are divided by the divisor, to avoid excessive mental calculation.” The key to this definition is that it is a “series of steps” or processes. So while the strategies I will be sharing can support these steps, it is important that the conceptual understandings are reinforced, so that students understand what it is and why it works. My method incorporates elements that can help with this, but continued inquiry into the place-value connections of the distributive property and/or partial quotients are needed.

Note: These strategies are for use after students have been introduced to division and students have spent time making connections to other strategies/models such as arrays, area, inverse operations, physical manipulatives, etc.

The Strategies

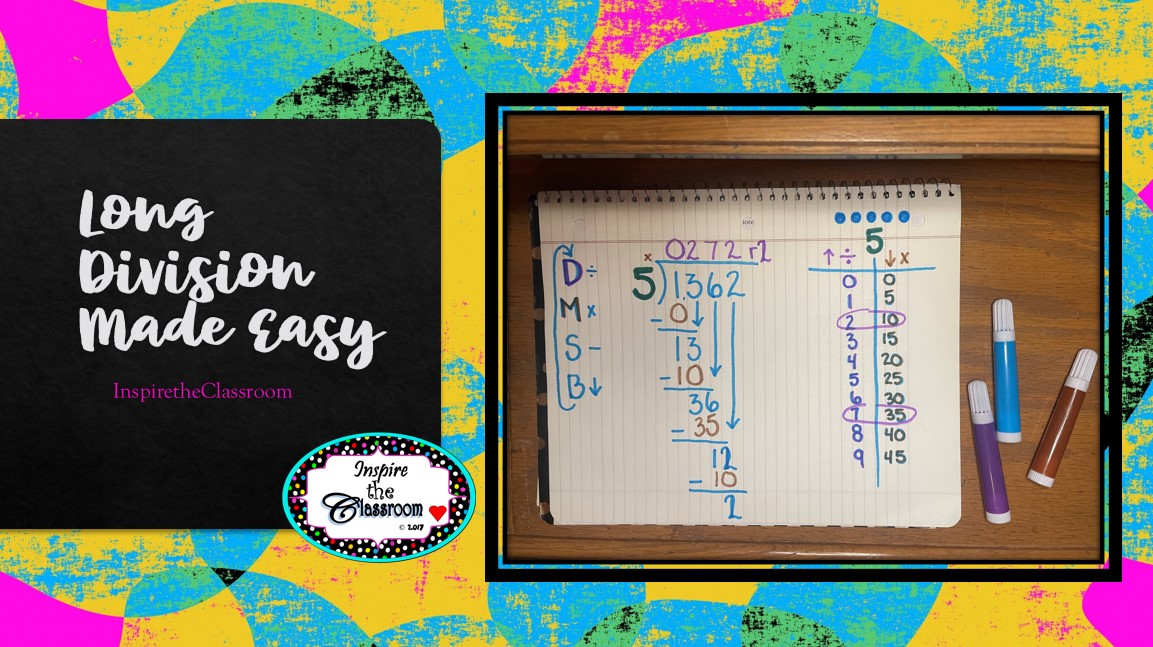
Ratio Tables (aka input output tables): These tables are fantastic tools that have so many connections within math and will be used in more complex ways in secondary math classrooms. However, I find them wonderful tools to introduce for multiplication and division. (Bonus: They are basically input output tables, and they are excellent for proportions and fractions.) To support even my most struggling math students, I include dots (see below) for them to count on (repeated addition) in order to create their table. In my example below, I have not yet labeled the chart to indicate what/number each column represents , but I will label each with the correct mathematical vocabulary depending on the operation (i.e. dividend, divisor, quotient OR factor/dimension & product/area). We will come back to this table later in the process.

For my students who struggle with multiplication facts, we add dots for them to count on as they build their table.

A Student-Friendly Acronym (DMSB/DMSBR): Acronyms are fantastic tools for remembering the steps of a process, and there are many that can be used for long division. Some examples are included below, but you can create one with your students (honestly, this is more fun, and they will likely have more success remembering it). For acronyms that do not include an R (repeat), you can draw an arrow that shows students to start back over and repeat the process.

Tip: For students who might need something tactile to help them internalize the steps, you can write the steps on an index card and use a paperclip, clothespin, or other object to allow them to mark the current step they are on.

  • Does Mcdonalds Serve Burgers Rare?
  • Dad, Mom, Sister, Brother
  • Dirty Monkeys Smell Bad

Color-Code & Label!

Let’s use a simple example to demonstrate this next step. I chose to use the number 5 as it is a number most children are comfortable skip counting by. You will need several colored pencils, markers, or crayons. Alternatively, labels are effective. It really just depends on the needs of your students.

I made my divisor (5) green, the quotients purple, and my dividend/products/totals brown. Labeling and/or color-coding helps students see where each number goes in the problems. Additionally, I have added those colors to my acronym to reinforce the steps and what they represent in the problem. I have also added arrows as an additional support (top, bottom).

Let’s Solve!

We begin by looking at the largest place value of our dividend. In this example, it is ONE. The first step is to DIVIDE. Since we are looking for a number of equal parts in division, we must first look at the column with the totals (brown).

DIVIDE (D): Prompt students to identify the closest we can get to 5 without going over. (If everything costs $5, and we have $1, how many things can we buy?- When in doubt, connect it to money!) In this case, the answer is ZERO. We need AT LEAST 5 to make one whole group. If we have less, we cannot make a group or “buy” anything. The closest to 5 (that’s not more than 5) is 0. Place a zero on top.

MULTIPLY (M): If we look to the left column, we see that means we made 0 groups of 5 (0 x 5 = 0). Place a zero under the one.

SUBTRACT (S): We need to identify how many did NOT make it into a group (i.e. what is remaining or leftover), so we need to subtract the total we started with (1) by how many total were placed into equal groups (0). 1-0=1. We have one leftover.

BRING DOWN (B): There are more numbers in our dividend, so we will bring down the next digit (3) and place it next to the remainder (1) to make the number 13. (Notice that in my example, I have drawn an arrow under the 3 to help students keep track of where they are in the problem.)

REPEAT (R or arrow): We now have 13 to place into equal groups of 5. You will repeat the steps from above looking this time for the MOST groups of 5 we can make out of 13 (Remember: We only have 13, so we can’t have more than our total). You will continue through these steps until there are no more numbers to bring down.

CHECK! The final step requires that student check their work with multiplication, remembering to add any remainder back in to the total.

long division example

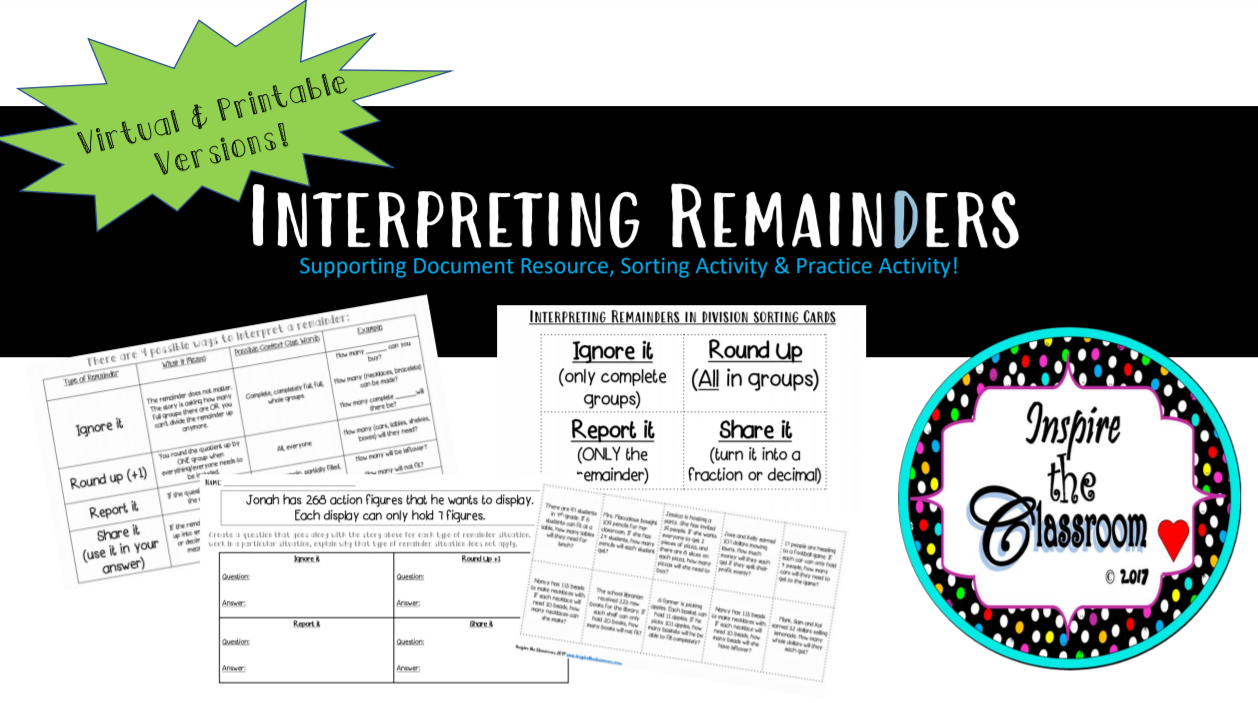
These are the strategies I have found to be the most successful when working with a wide-range of learners. As with any process, it will require repetition and reinforcement, but hopefully these supports will help with this internalization. If you’re looking for a great activity to help students apply their new division skills, check out one of my favorite products on interpreting reminders (FREE for a limited time) or other products on TPT! You can read the post here!

If you enjoyed this post, please pin, follow us, and check out my other products and posts! Happy Teaching!

Seven Simple Strategies for Solving Word Problems

By Katrina Maccalous, M.S. Ed.

7 Simple Strategies for Solving Word Problems

Where it all began…

I began writing this article last school year as my students and I dived head first into what is easily the most important and most challenging standard for elementary (and honestly, all grade levels of math)…multi-step word problems!

There’s something about putting math into a “story” that makes children seemingly forget everything they know about math. The fact that they are no longer simply solving computations, but required to transfer reading skills to comprehend and compute, adds another layer of thinking students must problem-solve. They may have mastered strategies for addition, subtraction, multiplication and division, but put that in the context of a multi-step problem, and suddenly it’s like a foreign language! Solving word problems, and especially multi-step problems is a product (no, not the math kind) of a problem-solver and critical thinker…what we all want for our children! But teaching computation skills alone, is not enough to produce those qualities. It takes explicit instruction, modeling, plenty of resources and lots of practice and feedback to begin to develop that flexibility in thinking.

Hopefully, the ideas, resources, and strategies I have to share in these posts will be useful in some capacity for any teacher struggling with this concept, as they were for me. Check out these ideas below…and share your own in the comments!

Onto the Good Stuff…

  • Operation Flow chart: I love this visual math flow chart! It takes a lot of modeling on how to use it along with many opportunities for guided practice, but it’s so worth it when students start internalizing the process. My version (which you can download for free) includes operation key words that can be used digitally or downloaded. The document also includes interactive math journal pages. You can also search for “strip diagram flow chart,” and you will find other examples.
  • Strip diagrams: This model was new to me when I moved to Texas and it took awhile for me to appreciate it. They are sometimes called tape diagrams or thinking blocks. Drawing or acting out what is happening in a word problem is an effective way for students to visualize what path they need to take to solve the problem and strip diagrams are a great option for this. Each block is comprised of a single block or line that represents the total/largest value. The rest of the blocks or strips represent the parts. Depending on whether the parts are equivalent or not, as well as the relative sizes of the parts, helps create a visual of a problem. Below is an example of an activity I use in stations to have students practice matching a word problem, strip diagram and equation to each other. It’s also available as a digital resource on my TPT page!
  • C.U.B.E.S.: This next strategy is one of the MOST important when helping students comprehend word problems. This excellent strategy aids students in internalizing the process of problem-solving is C.U.B.E.S., but it takes a LOT of modeling and practice to get them to use it successfully and independently. If you are unfamiliar with the acronym, C.U.B.E.S. stands for CIRCLE NUMBERS, UNDERLINE QUESTION, BOX IN CONTEXT CLUE WORDS (see below), EXAMINE THE PROBLEM (this is when I have students use the flow chart organizer process), and SOLVE. I start by having my students do a think-pair-share on strategies for solving word problems. Then we regroup, and share our ideas. After we’ve built some background knowledge, I pass out a graphic organizer with the acronym C.U.B.E.S. on it, and challenge the students to come up with what strategy each letter could stand for (get ready for some interesting thoughts, but also some ones that are right on target). Next, I share the anchor chart I’ve created and students copy the steps down on their organizer. This goes into their math resource folder or math journal for them to refer to as needed. After we’ve got our charts ready, I model the process, while they follow along, and they practice with guided support and independently (repeat the I do, we do, you do process as often as needed…for me, it’s often!) Check out my Pinterest Boards for some great examples created by other educators. This year I decided to create an organizer “plan” to support students. I use the organizer as a guide or plan for students to use to identify key information (or text evidence) that will answer the given question. Below is the organizer I have created to support my students.
Check back for more on how to effectively use the K/? T-chart!
  • Look for Context/Operation Clues: One of the most challenging aspects of word problems is the VOCABULARY. Students need to understand the meaning behind a whole plethora of words to support them with comprehending the context of a given problem. Work with students to brainstorm context clue words (connection to reading comprehension strategies) and create a class chart for them to reference. Note: for these ideas to work, be sure to emphasize that the operation and pathway to solving (strategies) are not always one-in-the-same. A problem can ask for the difference (the amount/distance between given quantities), commonly identified as subtraction, but “counting up,” which is often associated with be adding can be the strategy used. Honestly, any activities you use in other content areas to learn vocabulary can be transferred to math! Another Note: In addition to operation context clues, students need exposure to reading numbers in written form (i.e. thirteen, fourteen, fifteen), as well as ordinal numbers (i.e. first, second, third).
  • Practice, Practice, Practice in a Variety of Ways: One way for students to practice is first by trying to identify the operation(s). Give students a set of word problems with mixed operations and steps. Students sort by number of steps and then identify the operation(s). I don’t have students solve them for this part of the activity. My focus is on how to think through a word problem, not the computation yet. Have them practice creating their own word problems. Students can use the same sorting cards for this. They draw the number of steps, then operation. (Can be done with just one or the other too depending on students’ needs). Then they create their own problem for a partner to solve. With every practice we do, students are expected to use C.U.B.E.S. to make their plans and “find text evidence” to help them answer the questions.
  • Be a Coach: They say that if someone can teach another how to do it, then they have a solid understanding of the concept. With this activity, students write or try and explain how to solve word problems to their peers. (Bonus: It’s great practice for procedural writing.)
  • Task cards and lots of practice!: One way I have students practice is by sorting and matching equations, strip diagrams and word problems. We also engage in a daily thinking routine, where we analyze a different aspect of a word problem each day of the week. This can include: What is the problem asking? What information is important? What misconceptions do we need to watch out for? What connections can you make? What strategies could we use to solve this? How is this problem similar to other problems we’ve solved?

Additional Resources

This graphic organizer can be used as an interactive notebook page (either digital or hard-copy).
Scan this QR for FREE access to the operation flowchart and virtual notebook.

I hope you find these strategies helpful, and please share your ideas in the comments. If you enjoyed this article, don’t forget to sign up for notifications, so you never miss out on a posting or resource! Happy Teaching!

Interpreting Remainders in Division Problems

By Katrina Maccalous, M.S. Ed.

Hello again readers! I have spent the last couple of months writing and rewriting several articles on solving word problems. I found myself becoming overwhelmed by the amount of information I had to share, so I have since decided to put that part of the project on pause (for now!) and take some time to focus on another aspect of word problems…interpreting remainders!

I don’t know about your experiences with teaching children to interpret a remainder in a division word problem, but for me, it’s an ongoing process of model, guide, practice, feedback, and repeat! The ability to successfully solve these types of problems requires students to be able to think about real-world contexts and determine what makes the most sense based on the situation and the question asked.

There are many activities out there on this topic, but I am super excited to share the strategies that I have started using with my students! I wanted to really focus on the types of questions and key words that coincide with each type of remainder situation as a way to support my students who struggle with making sense of the problem. I first, posed a story for my students WITHOUT any questions. We discussed what was happening and drew it out.

After that, I began asking questions about the story (see our work below). Each question modeled a different way to interpret the situation. I had the students make some observations about the questions and the answers we gave. The purpose here being, to get them to notice that the computation remained the same, but which part of the answer we provided depended on what the question was asking.

Together we identified each type of question and charted our thinking. Here’s the original poster in all of its glory! (I am left-handed, and when I am in the moment teaching, my hand-writing is NOT the pretty handwriting of my anchor charts! 😂 So, please pardon my hand-writing here!

At this point, I launched into my mini-lesson on types of remainders. You can check out that lesson here (or below).

For our guided practice, students were given a variety of word problems. I told them that I did NOT want them to solve the problems yet. I just wanted them to read and analyze each scenario to determine what we were being asked to answer (round up, ignore the remainder, etc.). Through this activity, I was able to provide feedback and guide students to justifying their thinking with the support of our anchor chart.

Once I felt students were ready, I had them take another situation and create their own questions for each type of remainder situation. This allowed me to see if students were able to identify the particular wording of each type of question for themselves. As they created their own questions for the problem, they also provided the correct answer for each.

Tip: I have kept the remainder sort in ziploc bags for a math station, so students can revisit this topic during spiral review throughout the remainder of the school year.

interpreting remainders product image

You can get this resource as both a PDF AND interactive virtual activity at my TPT store.

Don’t forget to check out my other articles (…and I promise, the rest of my posts on word problems will be coming soon!), subscribe so you never miss another posting, as well as check out my TPT store and newly established You Tube education channel for more resources, ideas, and lessons!

Happy Teaching!

Geometry Ideas for Teaching Obtuse, Acute and Right Angles

By Katrina Maccalous, M.S. Ed.

Every year my students take multiple diagnostic assessments and benchmarks before state-mandated testing begins. And every year, what is one of our lowest scoring domains in math? …GEOMETRY…The vocabulary necessary to successfully navigate those geometry questions, is one of the main contributors–its a lot of definitions and images to internalize and apply.

Teaching geometry doesn’t have to be a boring, drill though! It can and should be fun and meaningful for children! I love brainstorming and researching ideas for how to help students learn concepts, and so I went down the rabbit hole yet again with geometry. The result was improved growth scores and learners that were engaged and challenged.

So if you’ve found yourself in a similar position, check out the following ideas below!

Bundle of Angle Fun:

Types of angles story book

This bundle is available at my TPT store. It was quite a hit with my students, who loved hearing the math ideas integrated into a familiar story! Since this time, I’ve created several more stories that relate to math content. One of my other favorites is my Fraction Land collection (story, game, and lessons). Check back soon for a post on teaching fractions for more on that!

This bundle includes the story “Goldie and the Three Angles,” suggested lesson plans, a foldable printable, vocabulary cards, scavenger hunt and art activity!

angle poster
As a thank your for stopping by this little blog of mine, I am including a FREE download of this vocabulary chart WITH definitions included!
angle graphic organizer
Here is a completed example of the angle foldable included in the bundle.

The final piece in this learning process, is learning to apply their understandings to test-style questions. Usually this takes the form of a series of lines labeled with variables, in which students are asked to identify the types/number of angles. One way to begin to introduce this, is to link it with geography! Provide students with local or regional maps, and have them highlight the different angles and lines they find (This works best after they have also been exposed to perpendicular and parallel lines.).

Please share any other ideas you have for teaching geometry, and as always…happy teaching!

Around to Rounding We Go! Rounding Numbers and Estimation in Elementary

By: Katrina Maccalous

As an adult, I assumed rounding and estimation were a simple concept…I mean…we use it all the time with finances! However, it became quite clear to me once I began teaching, that this concept would actually be one of the more difficult concepts for children to understand. While many can memorize the old rule of “5 or more, raise the score (round up)…4 or less, let it rest,” do they actually understand what they’re doing and more importantly WHY that rule exists?

The idea of why, and the meaningfulness behind the idea of rounding/estimation/approximation, has become a focus with my own students during our early days back at school (and spiraling throughout during morning routines). If they can see why it works and why we do it, then we’ve not only established a purpose, but worked on the idea of number sense. (So, so important!- I will definitely post about this all too crucial skill many times in the future.)

So, this week, my students began tackling this concept! My plan of attack is to always begin with inquiry. What do they know about rounding, and provide a real world example to grapple with.

This year, I used a future camping trip that I am planning as my example, but any examples such as grocery shopping or planning how many treats to bring for a party will work too. Without any instruction on HOW to determine how much I should bring, I told them the cost was $101.97, and asked them what would be an easier amount to bring. Without much hesitation, they all agreed that $102 would be easier to bring, because 0.97 cents is almost one dollar. They were rounding, even though they may not have realized it.

Then I gave them another example. This time 17, and asked them what number it was closest to. As I walked around the room, questioning students, I was pushing them to prove their thinking (justify). Below are some examples that they produced without any guidance other than to prove to me and others that 17 was closer to 20. During a quick share, I had those students explain how they knew that 17 rounded to 20. I made sure to also call on a student who brought up the idea of 5.

(This is the perfect opportunity to model WHY the 5 or more/4 or less rule works by showing how 5 is the halfway point of 10, so 15 is halfway between 10 and 20…50 is half of 100, and so on. I also show this on “rounding mountain,” with 5 at the peak.)

Based on this formative assessment and discussion, I determined that we were ready to challenge ourselves with a number in the thousands period (family). I followed the same process with a new number, and released my students to try and make connections to what we had just discussed. (How students react in these situations is really helpful in determining what level of modeling/direct instruction must take place.)

I had anticipated that I would need to model the steps with these larger problems, and I was correct. We regrouped, and I guided them through the process while modeling the thinking process of noticing what place value I was being asked to round to, what two multiples it was between (1,000; 2,000; etc.), placing those on the number line, finding the midpoint, and placing the number on a number line to determine which multiple it was closest to.

Then student had an opportunity to explain what they saw me do in their own words with a partner.

Since we are working on a blended learning model, we logged onto Canvas to watch another explanation and a “Rules for Rounding” fill-in-the-blank activity. Students took notes during these in their math journals for future referencing.

Rounding numbers rules
Student Math Journal Sample

After some more exploration and guided practice (dependent on the pacing of the lesson thus far), I like to have students take on the role of teacher and create their own “anchor charts.” This provides them the opportunity to practice “talk read talk write” and engage in a gallery walk to observe each others’ rules, ending with a closing discussion of ideas and any misconceptions seen.

Note: This lesson could easily be broken into multiple days, and it definitely needs to be revisited throughout the year.

Later in the week, we will move to applying this idea with compatible numbers and estimation. Many conversations and respectful debates will occur to analyze rounding examples and non examples! My goal here is to get kids thinking about why it works and also when it doesn’t.

Below I’ve included two virtual lessons I recorded for my students online, as well as some helpful tips, basic rules, and examples/resources. I will update this post as I, yet again, make adjustments based on observations from implementation!

Happy teaching!

Rules for Rounding:

  1. Identify (find) the number in the place value you are rounding to.
  2. Determine what two multiples the number is between.
  3. Which one is it closest to?
  4. If it’s halfway or more…think 5 or more…move up! (“5 or more, raise the score”)
  5. If it’s less than that…4 or less… make it go back (“4 or less, give it a rest”)
  6. Everything larger stays the same, everything after drops to zero.

Student Poster from Last Year:

Video Lessons:

Activities:

Roll and Round

Rounding Numbers Place Value Cards

Directions:

  1. Players take turns rolling a set amount of dice (tip: differentiate by place value size). They then arrange the dice to make a number (EXAMPLE: 5, 8, 1, 2, 2 might become 12,582)
  2. One player flips over a place value card to determine how they will round their number (nearest…10, 100, 1,000…)-again, another way to easily differentiate the task. Get it free here for a limited time!
  3. All players then round their number to the place value drawn. You can provide students with an open number line to support them if needed.
  4. The player with the highest value wins that round.

Compatible Number Match

Directions:

  1. Students lay all the cards face up.
  2. Players take turns finding two numbers that are compatible with each other.
  3. If they make a match and explain why the two numbers match, they keep the cards.
  4. Players continue taking turns until no matches/cards are left. The player with the most cards wins. (freebie here!)

Beginning of the Year Classroom Ideas (Even During a Pandemic!)

Hello everyone! Welcome back…or welcome for the first time! This post is all about sharing my room and organization this school year, amidst navigating Covid-19. So whether you are a parent or teacher, I hope you find this blog informative.

First off, it’s been really stressful. There has been so much uncertainty going into the school year at all levels. This new normal comes with a need for flexibility, compassion, and a positive mindset (I’m on a positive vibe mentality this year). We have been balancing both virtual and face-to-face classrooms so far, and it’s like two jobs in one. There have been technical issues, and a lot of troubleshooting…and this is coming from all sides (teachers, admin, parents).

me in front of classroom
Me, looking oh so snazzy in my sequins face covering!

Anyway, we have been in school for two weeks now. On my last video, I wasn’t sure what it was going to look like once kids started. I’m happy to say that it has been better than expected! My kids are amazing, everyone’s healthy, and now it’s time to get in gear and build those relationships, close those gaps and have fun doing it! Check out the video below for more!

I hope you enjoy! Check back for next week’s post! I’m excited to get back into posting about classroom lessons, activities, ideas and resources. I have been working on several projects that are just about ready to be uploaded to my TPT store, and I can’t wait to share them with you! (psssttt…there will be freebies included!)

Happy teaching and parenting!

5 Great Ways to Promote a Growth Mindset

Note from me, the author:  Hello readers! As I have been busy working to build my blog (that I started years ago, and left to fend for itself for quite some time), I stumbled across this old draft I had been working on while I was in grad school. As it relates to a concept dear to my heart…and a blog I recently posted…I decided that I would go ahead and publish it now! (Talk about a blast from the past!) I hope you enjoy this ancient relic of my past, find it useful, and as always, thanks for stopping by and happy teaching!

light bulb and brain

Recently, my current grad class posed the following discussion question:  What ideas do you have for having students set learning goals to personalize their learning? How can this be worked into the students’ daily practices (e.g., where, when, how)?

This got me thinking—thinking bu    “what a perfect time to create a post based on this practice!”

The idea of growth mindset versus a fixed mindset is trending right now and for a good reason:  for years students were raised to believe that getting good grades was what mattered. I, myself was one of them. I honestly cannot recall much of what was taught during my K-12 schooling. Today, we have learned that there is a much greater importance in instilling a thirst for knowledge in our students and children. We’ve realized that placing importance on performance achievement can result in what is called a “fixed mindset,” that fears failure and believes that success is the result of chance or “talent.” This “learned helplessness,” results in students failing to see failure as a learning experience…they do not try to figure out what to do differently the next time.

With this knowledge in hand and an understanding that this kind of mindset is learned, comes the task of developing students who instead have a growth mindset.

never stop learning

As teachers, we are required to create personal goals each year as part of our yearly evaluations. Knowing the importance of having a growth mindset, I made it a goal of mine to emphasize this in my own classroom. Below are some practices I have already implemented in my classroom (and still do!), as well as ones I think would be great to try, even for the littlest kiddos:

1.  Incorporate specific, personal learning goals and growth monitoring towards said goal:  

Sometimes my students set HUGE goals that could very easily become unattainable due to their enormity, so I make it a point to emphasize using smaller goals to build to the bigger goal. I want my students to feel successful, and the best way to do that is through those small, achievable goals. If we set small, personalized (differentiated but not “easy”) goals, then every student can feel successful and have an “I can” attitude. Before students move to set their goals, I have them take some time to practice being meta-cognitive…to take some time and reflect on their strengths and areas for growth.

goal setting sheet
~*~FREEBIE ALERT!~*~

learning reflection activity


(I’d like to take this statement farther and add that with “concrete, stretch goals” comes specific/precise feedback. I also can’t expect my students to be able to set an achievable goal if they don’t know what they’re doing well and hear how their teachers set next steps for them. I want to note too, that I feel it is important that my students also understand the why of the learning so it becomes meaningful for them.)

2.  General (but could be content specific): have students write a “not yet” goal on a note card and then tape it to their tables as a visual reminder. I’ve also done sticky notes on chart paper with goals and strengths for various things.

3.  In writing, we have writing offices. Each office has a genre checklist and a universal proofreading checklist (see above FREEBIE!). I use these checklists with students to mark strengths and next steps/goals with a vis-à-vis (so strengths and goals can be modified as needed). I like this strategy, because students know that in order to be proficient in the genre/first grade, they ultimately need to incorporate the elements listed…but we can focus in on the individual elements to help us get there. Some people use an “I’m learning to, I can” chart, but I found it just became a lot for students to navigate and use effectively when used along with the checklists.

4.  In math, we focus heavily on computational fluency (within 10), so many of our stations are centered on this..for upper grades, this can transition to multiplication/division facts . To help motivate students and goal set, I staple a “hiding number” card in each of their math journals. Students can then monitor their progress and work towards their goal of 10. They get SO excited for themselves, and the whole class breaks out in applause for each other when they move to a new hiding number (this is what Kathy Richardson uses to practice fact families).

5.  And finally, in reading each student has a bookmark with strategies on the front and levels on the back. During guided reading, we set a quarterly-level goal and mark it using a vis-a-vis (wet erase marker). We mark off the levels as we progress for visual affirmation. I’ve also highlighted a strategy with students if we determine it is something we want to get better at. Teachers Pay Teachers has reading strategy bookmarks you can download/purchase (the one I used, I would not want to post until I have gone through to ensure the images I used are still in the public domain).

Example of the backside of a reading strategy bookmark:reading level tracker example

For more ideas and resources check out my most recent post: Instilling a Growth Mindset Vs Fixed Mindset!

Growing a Growth Mindset vs ​Fixed Mindset

fixed mindset or growth mindset

What are Mindsets?

 “Growth mindset is the belief that intelligence can be nurtured through learning and effort, while intrinsic motivation is the volition to engage in a task for inherent satisfaction. Individuals with growth mindset believe that motivation can be nurtured, and that extrinsic motivation can be internalized (i.e., from extrinsic regulation to integrated regulation that is similar to intrinsically motivated behavior)” (Ng, 2018, p. 2). Alternatively, those with a fixed mindset believe that intelligence is something we are either born with our without and that it cannot be changed. These individuals tend to avoid tasks that might result in struggle or “failure,” and as a result may not be inclined to self-assess, reflect, and set goals that can promote growth. 

Impact on Student Learning

The American Academy of Pediatrics (2014) discusses how our words can positively or negatively impact children’s mindsets. The source references a study by  Stanford researcher Carol Dweck (n.d.), who conducted studies with students that involved using either general praises such as “you’re so smart” or language that focused on recognizing the effort or journey involved in the learning (American Academy of Pediatrics, 2014). Dweck found that students that were praised for being smart did not have an innate desire to face new challenges and actually produced lower test scores (American Academy of Pediatrics, 2014). 

The exact data related to this study was not provided in the video itself, but can be found in her book Mindsets. Children that are exposed to language regarding intelligence and a job well done were more likely to develop a fixed mindset or perfectionism over learning for understanding. Alternatively, children that were praised for effort and the learning process were more likely to develop a growth mindset and were more willing to “put in the hard work” (American Academy of Pediatrics, 2014, 5:45).

Sample Lesson Plans & Ideas

Below I’ve shared links and resources that I have found useful in my own classroom. I am spending a great deal of time this school year on Social Emotional Learning (SEL), and having a growth mindset has been a huge part of that.

  • Class Dojo has an excellent selection of videos on Social Emotional Learning.
  • Khan Academy has several lessons that can be accessed by students
growth mindset activity link
I absolutely love this set from fellow TPT’er Teach with Hope! (Bonus it’s a freebie!) I use it in some form or another every year. I especially love the sorting activity. I have the kids complete it after our mini-lesson and discussion, then save it in a folder to look back at when they need an emotional boost.

For some researched-based, professional development reading, Stanford University Psychologist Carol Dweck’s  Mindsets (2007), documents decades of research into the impact one’s mindset can have over growth and success. This resource provides educators and parents alike with insights into the impact of mindsets, and how we can promote a growth mindset within ourselves and others. 

Carol Dweck Mindset

For more ideas, check out a blog I wrote back in my grad-school days: 5 Ways to Promote a Growth Mindset. It’s a semi-oldie, but a goodie with some great activities and resources. And finally, our good ol’ friend Pinterest has TONS of resources on growth mindset. You can search the topic on their app. You can also check out my Growth Mindset board I created for more activities, anchor charts, and ideas! I wish you all the best this school year…and happy teaching!

References

American Academy of Pediatrics (Producer). (2014).48.2 Using Praise Appropriately: The Keyto Raising Children With a Growth Mind-set . Ginsburg. [Video file]. Retrieved fromAcademic Video Online: Premium database.

Ng, B. (2018). The neuroscience of growth mindset and intrinsic motivation. Brain Sciences,8(2), 20. doi:http://dx.doi.org.csuglobal.idm.oclc.org/10.3390/brainsci8020020

Classroom Update!

Okay…This video took me WAY longer than I wanted. First, I ran into issues with filming my introduction. Then there was the issue of my eyes…my daughter told me to look kind of at the camera, but a little off…so I did, and I ended up with what I think are crazy eyes! I also really struggled with the editing this time around. I think it was because I did so many takes, that it became difficult to piece it together the way I wanted. Anyway, here it is. I hope you enjoy and thanks for sticking with me as I learn this new way of blogging!

Happy Teaching!

Surviving Your First Year in the Classroom

Surviving Your First Year (or Month) in the Classroom

By:  Katrina Maccalous

Beginning your career in education is an exciting accomplishment! You are diving into a field that doesn’t always get the kudos it deserves, one that is fraught with long hours, stress, politics…and some of the most amazing children that will leave imprints on you (and you on them) for years to come! Today’s uncertain social distancing norms and six months outside of a classroom, makes it all the more challenging as teachers. “WHY,” you ask, would I mention these challenges to new teachers? Am I trying to scare them away from the profession? NO! By no means, am I trying to instill panic, but rather to reassure you. What you will feel this year is completely normal, and even the most experienced teachers struggle with many of these things. We did not choose this profession for an easy ride (and if you did, I suggest you reconsider this field)…we chose this profession to share a love of life-long learning and to make a difference in the world. Now, I will step off my soap box and let’s get to why you’re reading this article to begin with…strategies to help survive your first year (or month) in the classroom!

1.  Get excited! Go to a teacher supply store, peruse Amazon, ransack the dollar store and discount aisles of target! You’ve earned it and deserve to be able to celebrate by creating a classroom environment that you love…and all the fun teaching supplies that go along with it.

Picture of ecommerce

Tip: It can get VERY expensive, very fast. I could buy out a whole store if my wallet would let me! Remember, you will build your supplies up as time goes on. Those teachers that have those amazing Pinterest/Instagram-worthy rooms, either have the cash flow to spare, have collected for years and years, or are highly creative and either make the stuff themselves or know how to bargain shop. Below are some of the must have items I use. There are many ways to get the look you want without breaking the bank.

  • Teachers are always getting rid of things they no longer need either at the beginning of the year or end…take whatever you can get!
  • Teachers Pay Teachers and other similar online sites have ton a of free resources you can print off and laminate or purchase for only a couple of dollars.
  • Donations and thrift stores/garage sales are another great place to look for items. Many places will provide donations if you know where to look!)Be sure to get everything organized BEFORE school starts. Once the school year begins, you can continue to adjust and make improvements, but get the essential things done now while you have time: borders, fabric or butcher paper background if permitted, organize supplies and cabinets, make a to-do list with all of the essentials you need/need to get done and prioritize them. I always make lists in my head or suddenly remember something that I want to do…then forget. Writing it down has been a lifesaver!

2. Plan out the first week. The first week is really a time to set expectations, get to know each other, learn routines, etc. DON’T skip this and think you will just jump into the learning. Trust me. A well-structured classroom is key to promoting a positive-learning environment. How you start the year really does matter. I learned this the hard way, when I moved back up to 4th grade and assumed they would know the expectations and only briefly reviewed…not so. Just because they’re older, does NOT mean they know how YOU expect your class to run.

3. Have a good and MANAGEABLE classroom management system ready to start on day one. There are sooo many ideas out there that sound awesome (and many are!), and some teachers can seamlessly manage these complicated systems. More power to them! But it doesn’t have to be some over the top system that requires you to constantly be rewarding or doling our consequences. Make it simple, make it clear, make it manageable and be consistent. Don’t be afraid to try something else if the first idea doesn’t work the way you’d like. Here’s a very handy planning template that can serve as a working space to document your routines, procedures and expectations and doubles as a checklist to support initial, explicit instruction, as well as on-going reinforcement. The guide is editable, so you can customize it to suit your classroom needs…and best of all…it’s FREE!

4. Set a timer to help with pacing…do it! Just do it. It can be one for you personally or a visual classroom timer, but it’s so easy to get lost down the rabbit hole and mess up pacing. ClassDojo (in your classroom, there will be a menu of options in your “toolkit,” and ClassroomScreen are just a few examples.

Hourglass, Clock, Time, Deadline, Hour

5. Ask questions. We want our students to ask questions to ensure they have a good grasp on the content…why should it be different for adults? It does not mean you are incompetent. Please don’t be afraid of this. It actually shows you care and respect the advice of your colleagues.

6. Be collaborative. This builds off the previous point. Teaching is a tricky job and sadly, people are people, and there will be talk. Don’t make yourself come off as knowing it all and that you don’t need any help or ideas. There are plenty of studies that show that we get some of our best ideas through collaboration.


7. Have a good support system. You’ll need it. Whether it’s to vent about a tough day or celebrate a success. Having people you can talk to, who will listen and can relate, is priceless.

8. Remember, they are only kids! These tiny people sometimes come with BIG personalities, but don’t let that fool you or knock you down. And don’t engage in battles with them. It will become a power struggle and it will just wind up with everyone’s emotions running high. When you get frustrated, let them know you respect them too much to argue. That once they calm down (and honestly, us too), we will talk about it…and when you do, you must hear them out. Trust and respect will get you a long way. Everyone wants to feel heard and assured that their feelings matter…even if they are wrong! Honestly, listening is one of the best pieces of advice I can give. Listen to students, colleagues, parents.

9. Don’t neglect your well-being. Your success depends on you being in the best state of mind and body. Practice mindfulness (with students too!), take a break to do something you enjoy on weekends. GoNoodle has some great mindfulness exercises for students AND can be use with social distancing or as brain breaks.

10. Journal-journal about your day, journal about changes you want to make next time, journal about what went well. Write it down so you don’t forget!

11. Get a great classroom library selection…even if you aren’t the RLA/Literacy teacher!

12. BREATHE!!!! You will survive. You are making a difference. You can do it.

13. And have fun!!!!!! This is the best, most rewarding job in the world!

For more teaching ideas, check out my TPT store, as well as some great ways to grow a growth mindset and make learning more engaging for children. You got this! Have a wonderful year, hang in there and happy teaching!

It's time to inspire.